eSIM Phone Installation Guide by Device Type

Follow these simple instructions to install and set up your eSIM

Installation guide by device to assist you on installing the eSIM on your device. Please carefully follow the step and make sure you are connected to a stable WiFi connection during installation.

WiFi Connection Required

For the smoothest installation experience, please connect to a stable WiFi network before installing your eSIM. Sometimes the installation happens quietly in the background - that's perfectly normal! Just check your Mobile Services or SIM manager afterwards to confirm your eSIM was successfully added.

Important Notes Before Installation:

  • Installation limits: Some eSIMs can only be downloaded and installed once, while others can be reinstalled multiple times (usually up to 3 times max). We strongly recommend not deleting your eSIM as it may not be able to be reinstalled. This is especially so for single use eSIM issued by local eSIM providers and those with single use disclaimers.
  • Device binding: Each eSIM installation can only be installed on a single device. Once installed, it's tied to that device.
  • Device requirements: Your phone must be carrier-unlocked and eSIM-compatible.
  • Data roaming is mandatory: You MUST enable data roaming for the eSIM to work, even in the destination country.
  • Prevent conflicts: Disable other SIMs/eSIMs when using your travel eSIM.
  • APN configuration: iOS devices auto-configure APN (except IIJ Docomo Japan eSIM). Android users may need to manually set APN unless already configured - please recheck to be sure.
Japan eSIM Special Instructions (Click to expand)
  • Most Japan eSIMs work automatically - no manual configuration needed
  • IIJ Docomo eSIMs only: These specific eSIMs require manual APN configuration to get full connectivity functionality
  • APN setup: If you have an IIJ Docomo eSIM, check your email for the specific APN details

Important: Your phone must be carrier-unlocked to use eSIM. Compatible with(excluding iPhone from China):

  • iPhone XR
  • iPhone XS
  • iPhone XS Max
  • iPhone 11
  • iPhone 11 Pro
  • iPhone 12
  • iPhone 12 Mini
  • iPhone 12 Pro
  • iPhone 12 Pro Max
  • iPhone 13
  • iPhone 13 Mini
  • iPhone 13 Pro
  • iPhone 13 Pro Max
  • iPhone SE 3 (2022)
  • iPhone 14/14 Plus/Pro/Pro Max
  • iPhone 15/15 Plus/Pro/Pro Max
  • iPhone 16/16 Plus/Pro/Pro Max

How to install an eSIM on iPhone

1

Before You Start

IMPORTANT: WiFi Connection Required
Please connect to a stable WiFi network before installing your eSIM for the best experience. Don't worry if the installation seems to happen quietly in the background - just check your Mobile Services or SIM manager page to confirm your eSIM was added successfully!

Additionally, ensure your iPhone is:

  • Carrier-unlocked
  • Running iOS 12.1 or later
  • Connected to a stable WiFi network
eSIM Setup
2

Installation Method 1: Quick Install (iOS 17.4+)

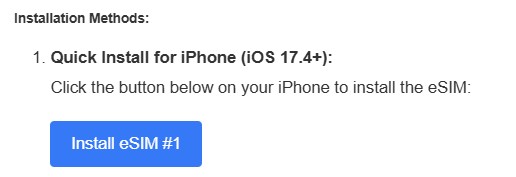
If you have iOS 17.4 or later, you can use the quick install method:

  1. Click the "Install eSIM" button in your email on your iPhone
  2. A popup will appear asking to add the cellular plan
  3. Tap "Add Cellular Plan"
  4. Follow the on-screen instructions

Note: This method only works when you open the email on the iPhone where you want to install the eSIM.

Step 2: Installation Method 1: Quick Install (iOS 17.4+)
3

Installation Method 2: Scan QR Code

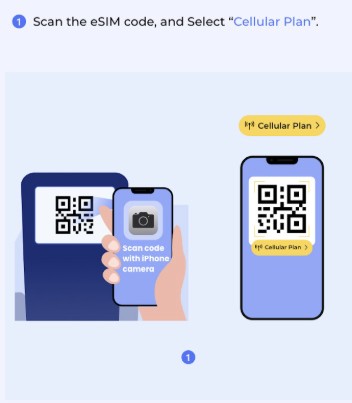
Use this method for any iOS version:

  1. Open your iPhone Camera app
  2. Point it at the QR code in your email
  3. A notification will appear at the top: "Cellular Plan Detected"
  4. Tap the notification
  5. Select "Add Cellular Plan"

Alternative: Go to Settings > Cellular > Add Cellular Plan, then scan the QR code.

Step 3: Installation Method 2: Scan QR Code
4

Label Your eSIM

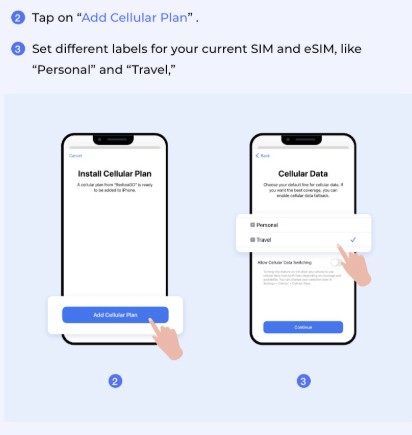
After adding the plan, you'll be prompted to label your eSIM:

  1. Choose a custom label or select from the list
  2. We recommend using: [Country] eSIM (e.g., "Japan eSIM")
  3. This helps identify the eSIM if you have multiple plans

Important: Remember which device you installed each eSIM on. Each profile can only be installed on one device.

Step 4: Label Your eSIM
5

Configure Cellular Settings

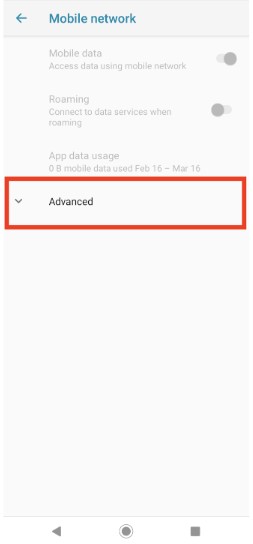
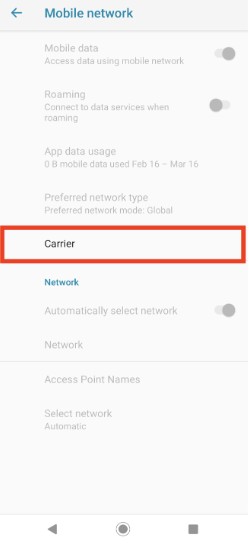
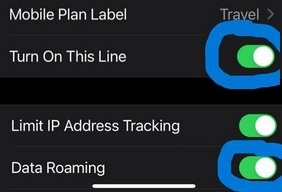
Critical Step: You must enable Data Roaming for the eSIM to work:

  1. Go to Settings > Cellular
  2. Tap on your eSIM (shown with the label you created)
  3. Toggle ON "Data Roaming" - This is essential!
  4. Toggle ON "Turn On This Line" if not already enabled
To prevent conflicts: We recommend turning OFF other SIMs/eSIMs when using this eSIM. You can do this in Settings > Cellular by toggling off other lines.
Step 5: Configure Cellular Settings

🔧 Troubleshooting Tips for iPhone

  • No data connection?
    • Verify the APN is set correctly (most important for Android and Japan eSIMs)
    • Check that data roaming is enabled
    • Ensure your eSIM is selected as the active data SIM
  • Can't find network? Try manually selecting a network operator instead of automatic selection
  • Multiple SIMs causing issues? Disable other SIMs/eSIMs temporarily
  • Settings not sticking? Restart your device after making APN changes
  • eSIM not visible? Check Mobile Services/SIM manager - it may have installed without notifications
  • iPhone specific: If quick install doesn't work, try the QR code method or manual entry

Still need help? Contact our support team at support@airdatalink.com with your order number and specific issue.

📋 Quick Setup Checklist

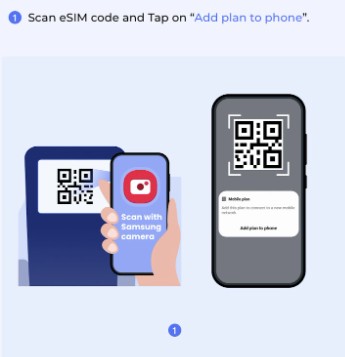
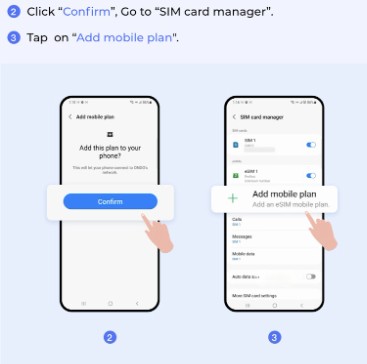
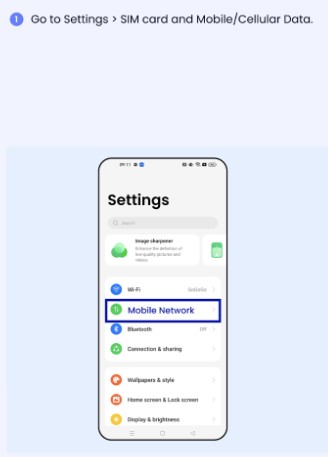
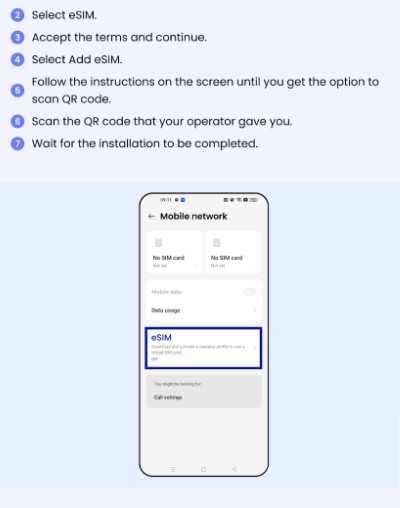
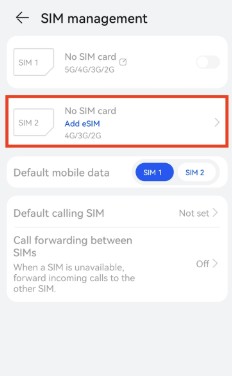
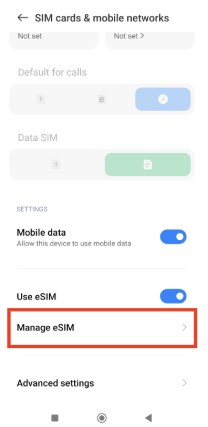
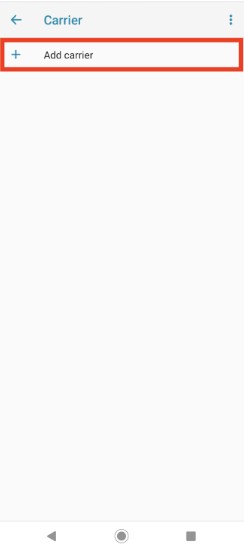
Follow these steps regardless of your device type:

  1. Connect to WiFi before installation
  2. Go to device settings under Mobile Services or SIM manager
  3. Find option to add eSIM, then scan QR code or enter details manually
  4. Follow onscreen instructions and label your eSIM for easy identification
  5. Enable your eSIM profile when you want to use it
  6. Enable roaming for the eSIM profile (mandatory!)
  7. Configure APN if required (especially for Android and Japan eSIMs)
  8. Disable other SIMs to prevent conflicts
  9. Restart device after setup for best results

Need Additional Help?

📧 Email Support

Contact support@airdatalink.com

Include your order number and device type

📊 Check eSIM Usage

Monitor your data usage

Use your ICCID from the email

WhatsApp with Us